Riding High: Getting the Perfect Fit
When it comes to snagging either your first pair of cowboy boots or adding another trusty pair to your collection, getting the fit just right is as important as a good saddle on a buckin' bronco.
Western boots are built tough, ready to stand the test of time, making them a solid investment for years of wear.
They're made to brave the wildest of conditions, from rugged trails to fierce weather, making them the perfect choice for anyone who spends their days under the big sky.
And sometimes... we just want them to look good.
Well, either way, boots should also be as comfortable as a well-worn saddle.
They're designed to hug your foot and offer top-notch support. They provide stability that keeps you on your feet, whether you're riding into the sunset or kickin' up dust on the trail.
Here at Jack's we have an Ariat store... 3000 sq feet of just Ariat merchandise. Ariat has a complete guide to fitting cowboy boots.

1. Put the boot on and listen for the faint “pop” as your foot slides into place.
2. Confirm the proper amount of heel lift (there should be some lift, but not too much).
3. Comfortably stand, and then place a sideways thumb between the tip of your toe and the end of the boot. This is the proper amount of space between your toes and boot end.
4. Walk around to confirm comfort, fit, and heel lift.
Put on Those Boots
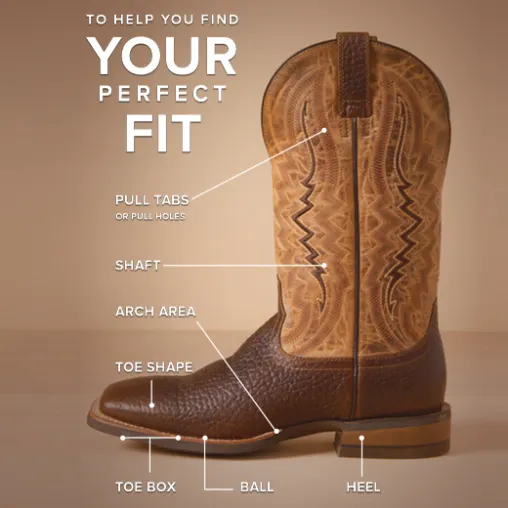
The first thing you want to do when fitting a new pair of boots is to insert your foot into the boot’s shaft and firmly grasp the pull tabs or pull holes.
- The shaft is the upper portion of the boot where your calf and shin will rest.
- Depending on the boot, there will either be holes or tabs to assist in pulling the boot on.
Once you pull the boots past the resistance point in the arch you will hear a faint popping noise as your foot enters its resting place. The resistance point will come from the top of your foot in the arch area and also your heel inside the shaft.

Check for Slight Heel Lift
Heel lift is the gap between the insole of the boot and your heel. It is caused by a slight amount of room from the arch to the toe area of the boot. This room should not exceed more than 1/8th of an inch and is necessary for a proper and comfortable fit.

Check the Fit
Once you have the boots on it's time to make sure they fit. To ensure the proper fit for any boot, make sure the widest part of the ball of your foot rests on the widest part of the boot’s outsole.
Check the Tip of the Boot
Once your feet feel comfortable, stand up in your boots and try to use a sideways thumb to help judge the distance between the tip of your toe and the end of the boot. Your toe should rest about one thumb width away from the end of the toe box. Here are a couple things to keep in mind:
- The toe box is the portion of the boot that houses your toes. It is the portion of the boot that starts at the base of your toes and ends at the tip of the boot. Wider toe shapes will often have a wider toe box.
- Remember everyone’s toes are a different length so it’s always a good idea to have that sideways thumb distance from the tip of your toe to the end of the toe box.

Walk Around to Confirm Comfort and Fit
Whether you are trying boots on in-store or at home make sure you walk around in them to ensure you have the appropriate heel lift. Remember, 1/8th of an inch is the ideal room for heel lift. Anything more than that and the boots will feel large and clunky, anything less will make your boots feel too tight.
As you pull the boots on you may experience slight resistance in the boot’s arch area. This is expected as it allows your foot to get a snug fit and will ensure that your heel also has the appropriate heel lift.
Don’t forget that socks will also have an effect on the way the boot fits. We recommend using a good boot sock when trying on a boot. Remember, the sock you try the boot on with should be the same sock you will wear in the boots. A thicker sock may lead to a larger size needed or a thinner sock may feel like you need a more snug fit.

Continue reading


